24/7 Customer Support
Free returns
Same-day & Next-day Delivery
Quality Guaranteed
Download the APP
Categories
Whether you are a seasoned tiler laying a new bathroom floor or a DIY enthusiast refreshing a kitchen splashback, the quality of your finish hinges on the tools you use. A perfectly tiled surface can be let down by messy, uneven grout lines. With so many options available, selecting the right grouting tools can feel overwhelming. This guide is designed to cut through the clutter, offering practical advice to help you choose the essential equipment for a clean, durable and professional-looking result.
We will walk you through the key considerations when selecting your tools, highlight some dependable options for specific tasks and answer common questions to help you approach your next tiling project with confidence.
Making an informed choice is simple when you know what to look for. Focus on the task at hand, the materials of the tools and the finishing touches.
The first step is to identify your primary task. Are you applying fresh grout or removing old, discoloured grout?
grout float is non-negotiable. Its purpose is to press grout firmly into the gaps between tiles. Look for one with a firm but flexible base to ensure good compaction without scratching the tiles and a comfortable handle to reduce fatigue during larger jobs.grout removal tool. Manual rakes with durable blades are excellent for precision work, while oscillating multi-tools with specialist attachments can speed up the process on larger areas. The effectiveness of these regrouting tools is crucial for creating a clean channel for the new grout to adhere to.The material of your tool directly impacts its performance and longevity. For a grout removal tool, blades coated with tungsten carbide grit offer a good balance of abrasion and durability, allowing you to clear old grout efficiently. For a grout float, a lightweight foam or rubber base can make the tool easier to handle, while a non-stick surface helps in achieving a smoother application and simplifies cleaning.
A high-quality grouting sponge is more than just a cleaning accessory; it is a finishing tool. After applying grout with a float, the sponge is used to tool the grout lines into a uniform, concave shape and clean excess residue from the tile face. A good sponge should be highly absorbent but also dense and durable, with rounded edges to prevent digging into the fresh grout lines. A complete DIY grouting kit should always include a reliable sponge.
Based on functionality and user-friendliness, here are some recommended tile grout tools to consider for your kit.

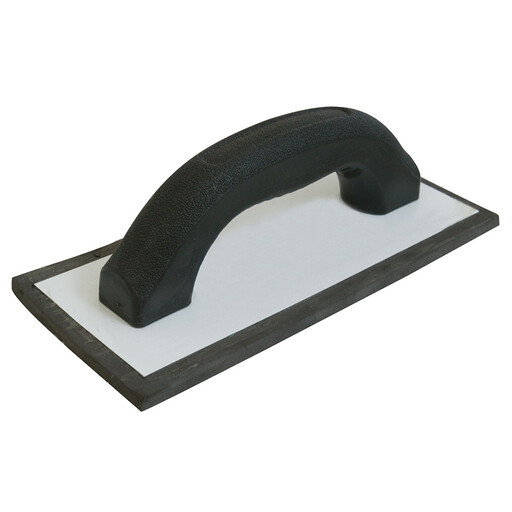
grout float offers an excellent combination of functionality and affordability. Its lightweight design, featuring a compressed foam base, makes it easy to handle and reduces arm strain during application. It effectively spreads grout while remaining easy to control for a clean finish.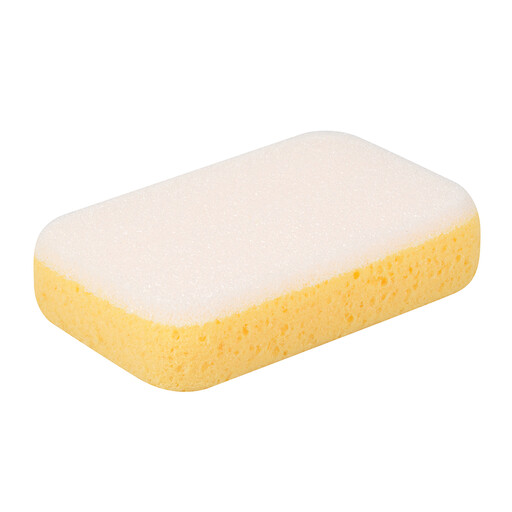
While the right tools are crucial for your tiling, the final aesthetic of your room often comes down to the details. If you are planning a wider refurbishment, consider how your new tiles will pair with your wall coverings. For a modern and sophisticated look, explore our curated selection of silver wallpaper to complement your finished project.
1. What basic tools do I need to grout tiles? For a standard grouting job, you will need a grout float to apply the grout, a grouting sponge and two buckets of water (one for initial rinsing, one for the final clean) to clean the excess and a margin trowel for scooping and mixing the grout. If you are removing old grout first, a grout removal tool is also essential. These items form the core of any good DIY grouting kit.
2. Can I apply new grout over old grout? It is not recommended. Applying a thin layer of new grout over old, cracked or mouldy grout will not create a strong bond and will likely fail quickly. The old grout can also harbour mould that will grow through the new layer. For a durable and hygienic finish, you should always remove the old grout first using a suitable tool like a grout rake.
3. How long after grouting can I clean the tiles? This depends on the grout manufacturer's instructions, but typically you will perform an initial clean about 15-30 minutes after application. Use a damp (not wet) grouting sponge to gently wipe away the excess grout from the tile surface. After 2-3 hours, a dry haze may form, which can be buffed off with a clean, dry cloth or a microfibre towel. The grout will need to cure fully (usually 24-72 hours) before being exposed to significant moisture.