Anycubic Kobra X Multi-Color 3D Printer, 4-Color Built-in & 19-Color Expandable, 260 × 260 × 260 mm, Up to 600 mm/s High-Speed Printing, LeviQ 3.0 Auto-Leveling, AI Detection


Delivery options
order before 23:00
Our promise
30 Days Free Returns
24/7 Customer Support
1 Year Manufacturer's Warranty
Product Description


Important Information
Detailed Product Description
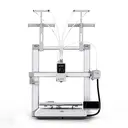
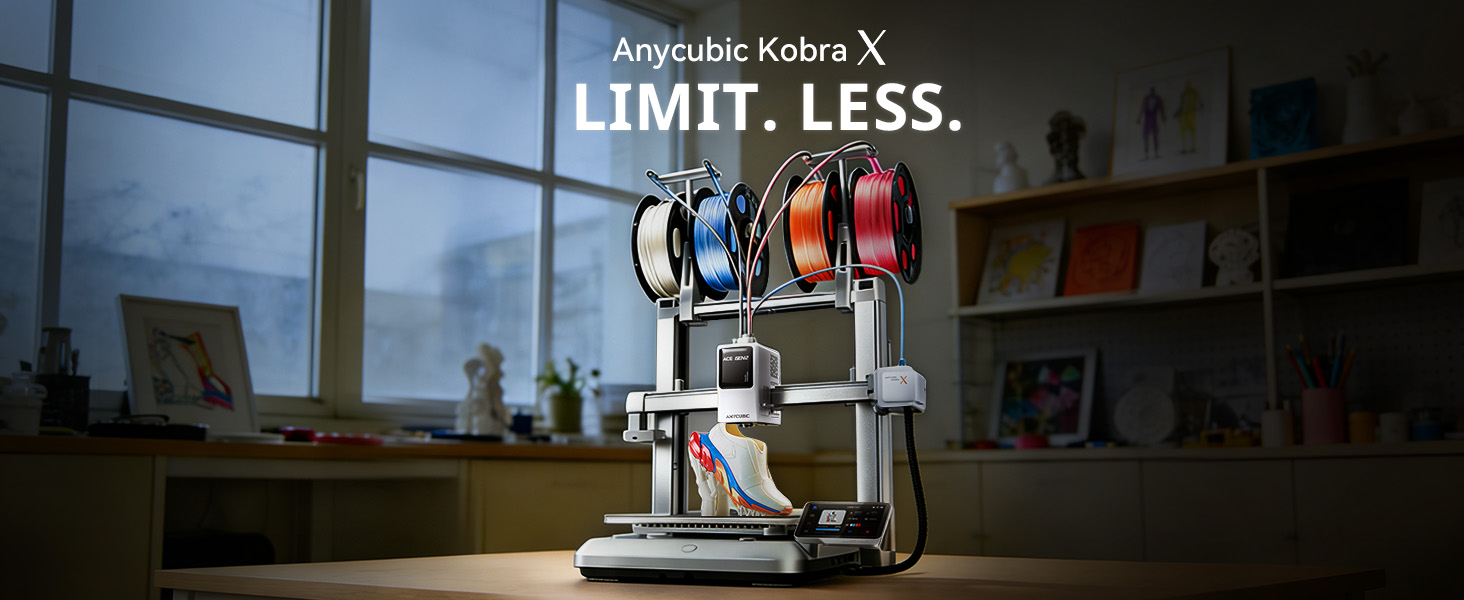
Anycubic Kobra X is a next-generation high-speed multicolor FDM 3D printer designed for creators, engineers, and makers who demand both versatility and efficiency. With a spacious build volume, intelligent automation, and advanced multicolor capabilities, it delivers fast, reliable printing while supporting a wide range of materials. Whether producing prototypes, functional parts, or colorful models, the Kobra X provides professional-grade performance within the Anycubic ecosystem.
Key Features
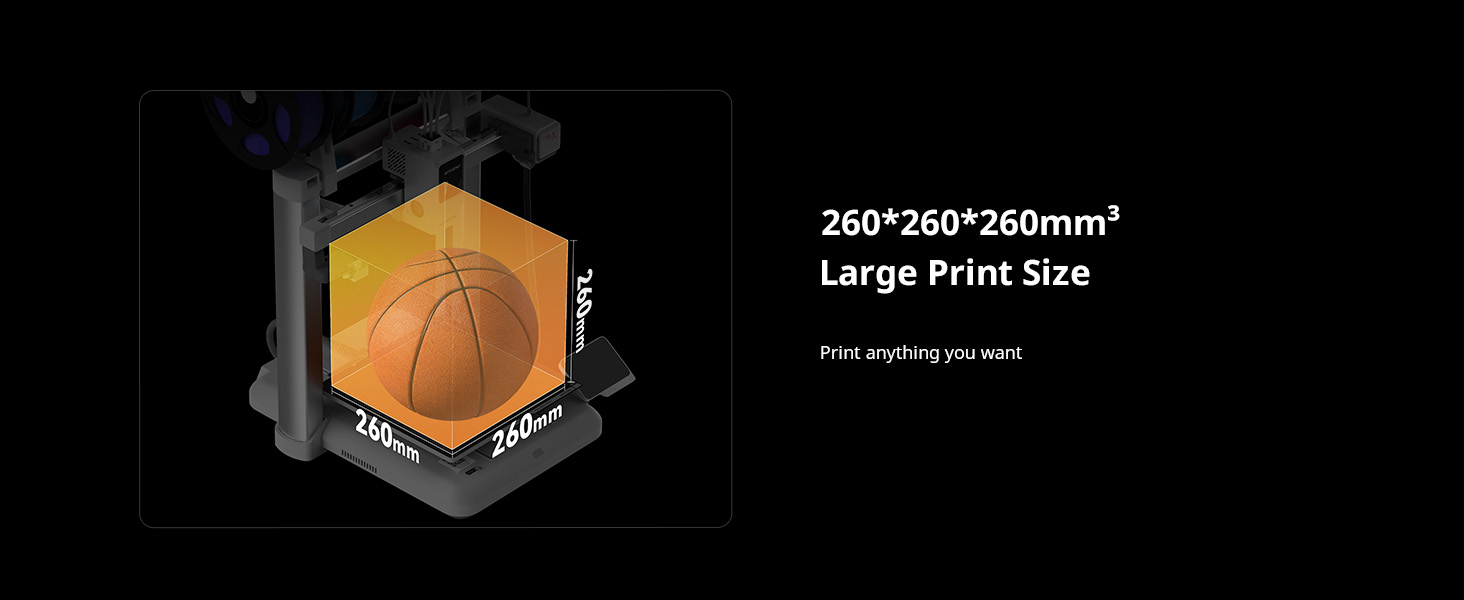
● Large Build Volume
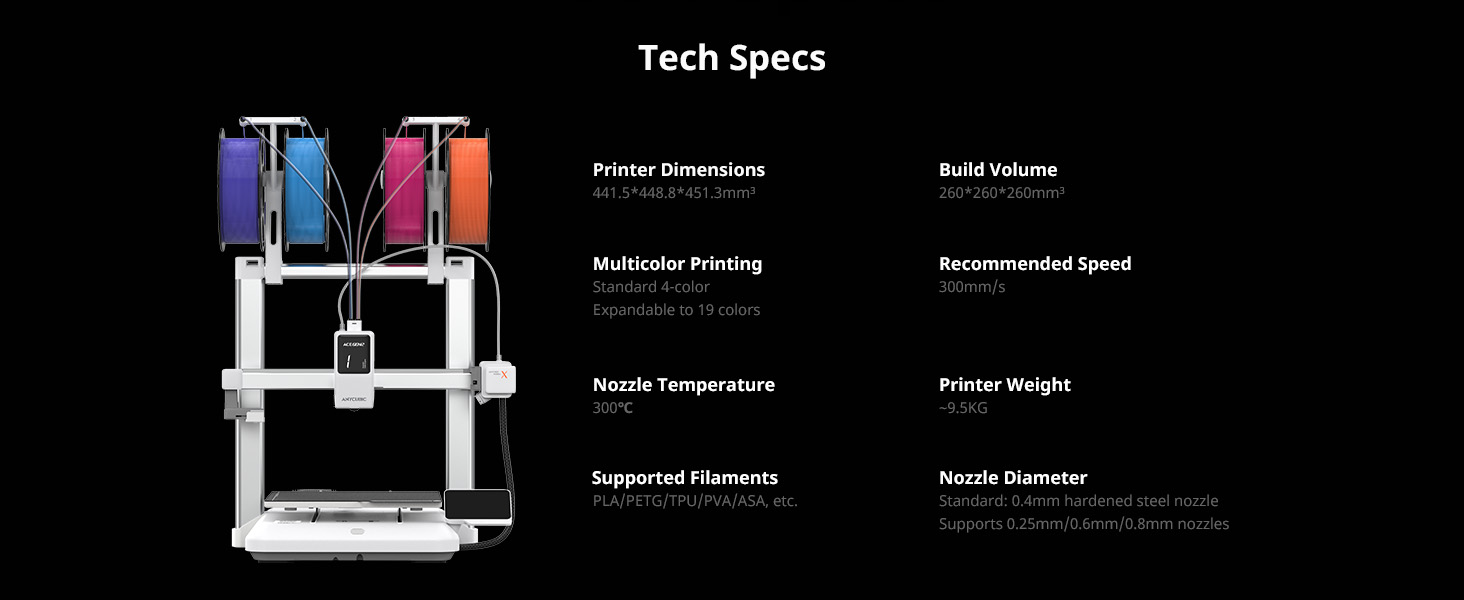
Generous 260 × 260 × 260 mm³ print space allows users to produce larger models or multiple parts in a single job.
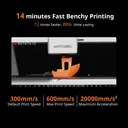
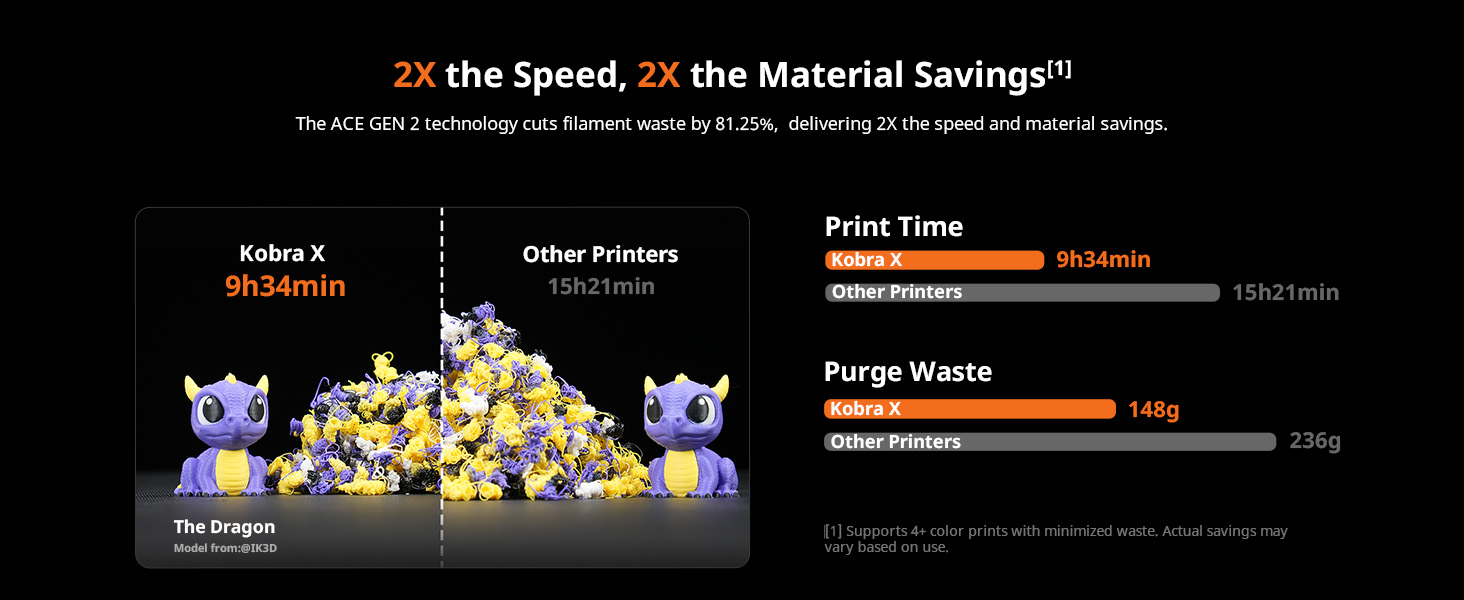
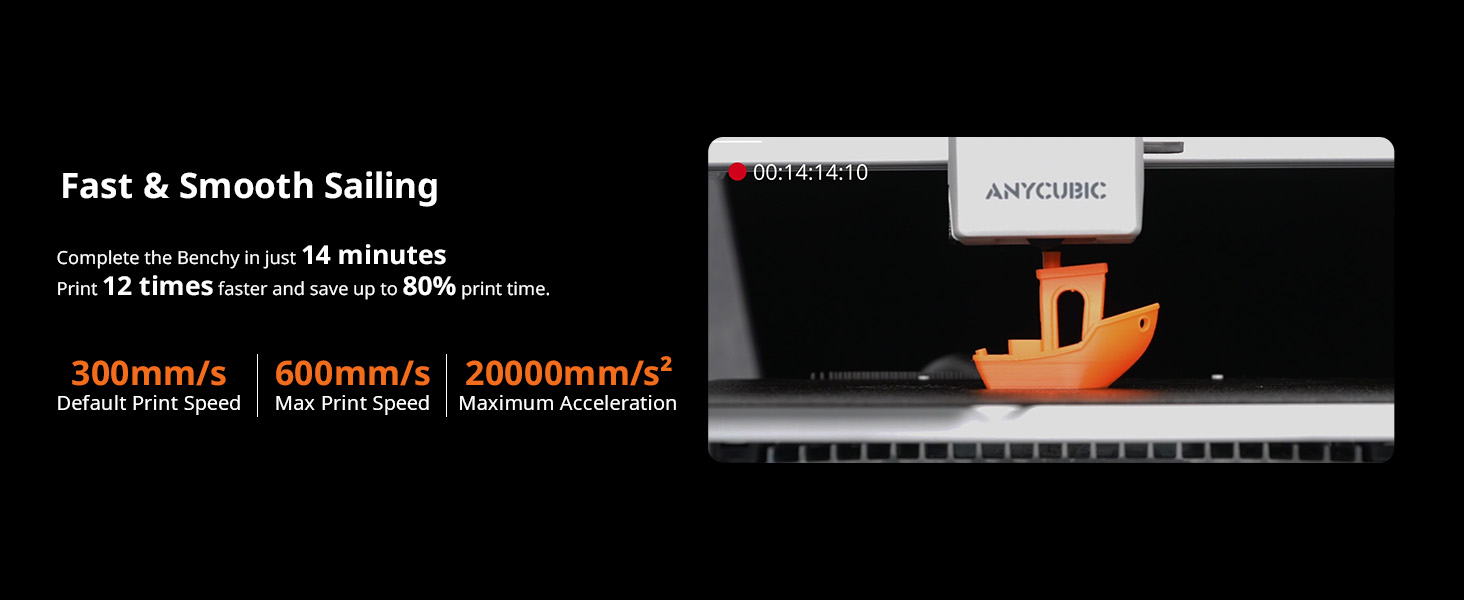
● High-Speed Printing Performance
Recommended speed of 300 mm/s and maximum speed of 600 mm/s, enabling faster project completion without sacrificing quality.
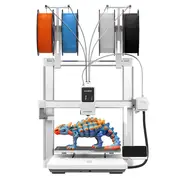
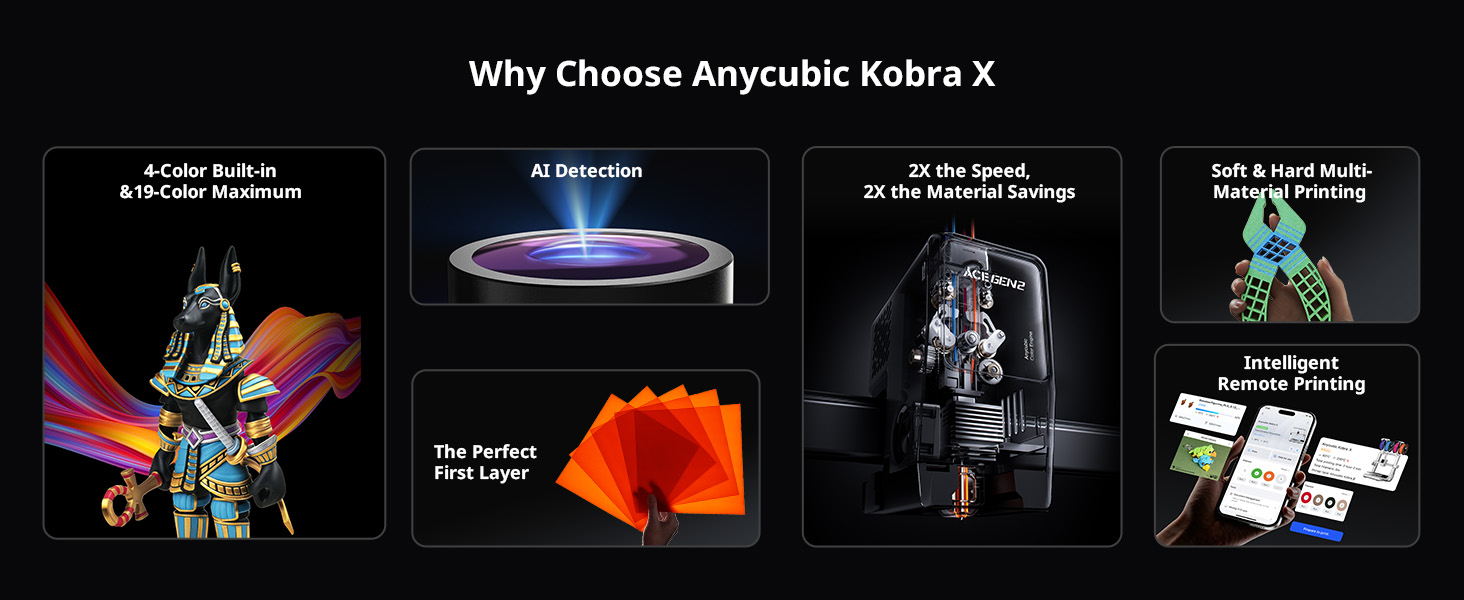
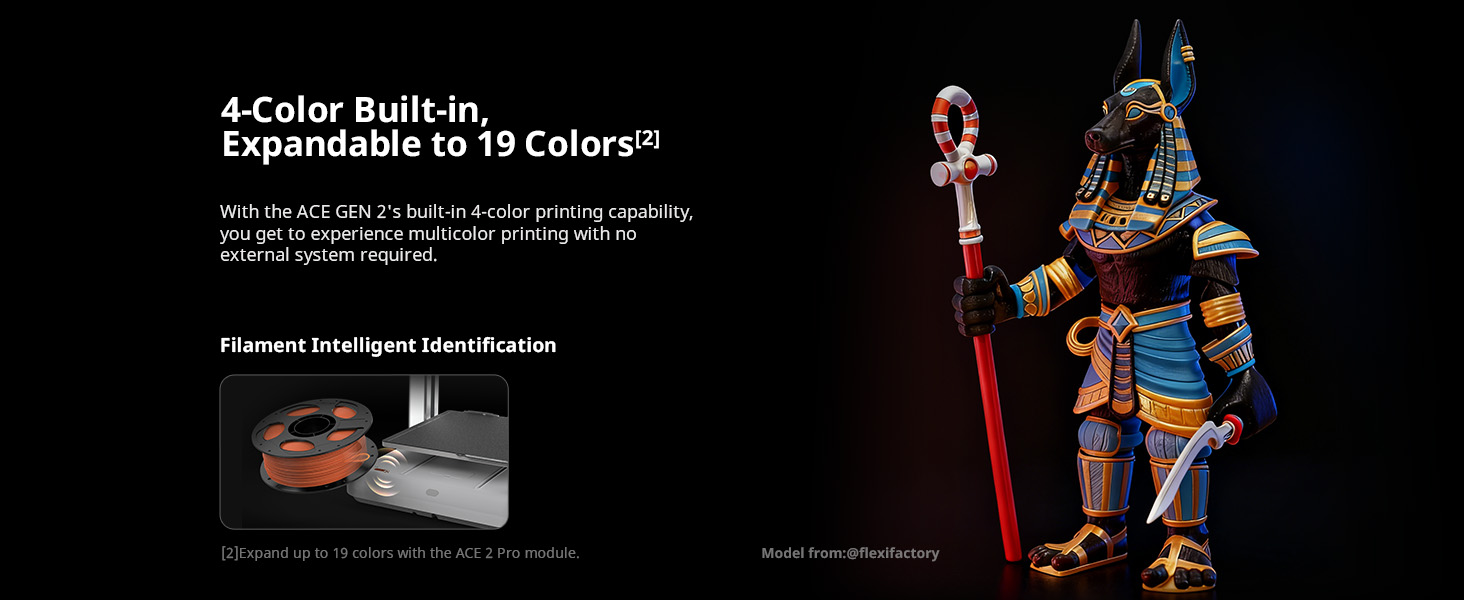
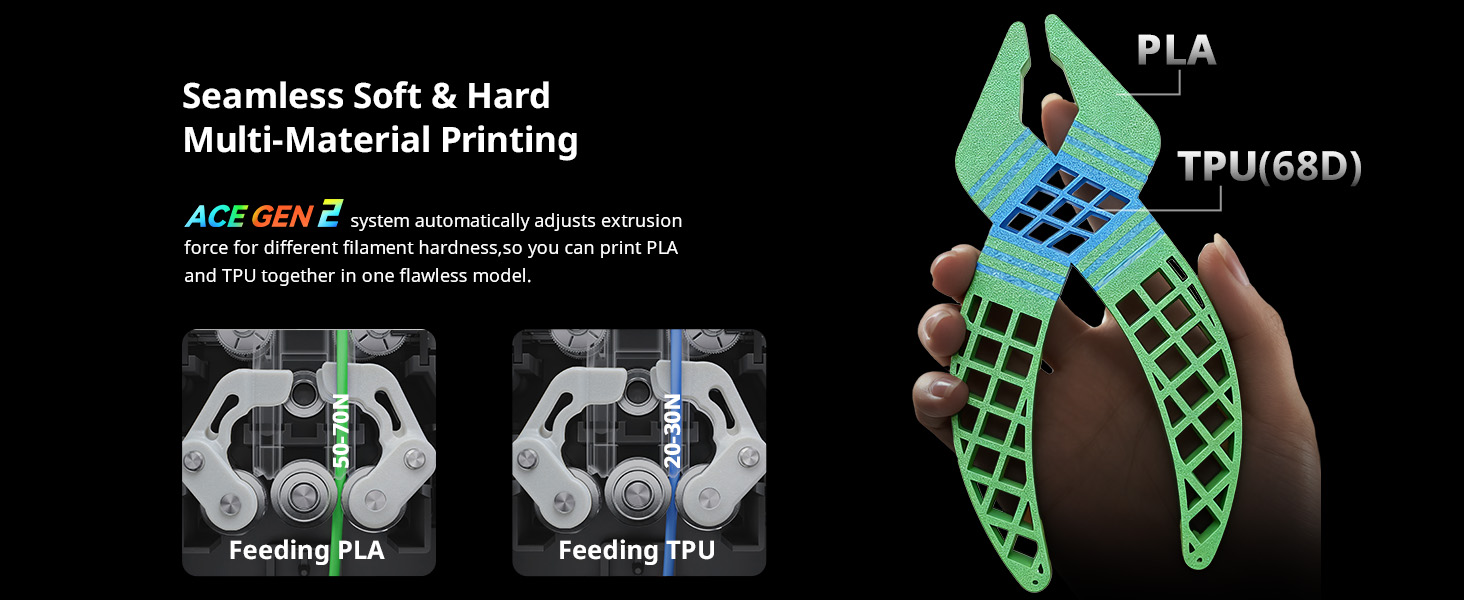
● Advanced Multicolor Printing
Native 4-color printing with expansion capability up to 19 colors, unlocking new possibilities for creative and complex models.
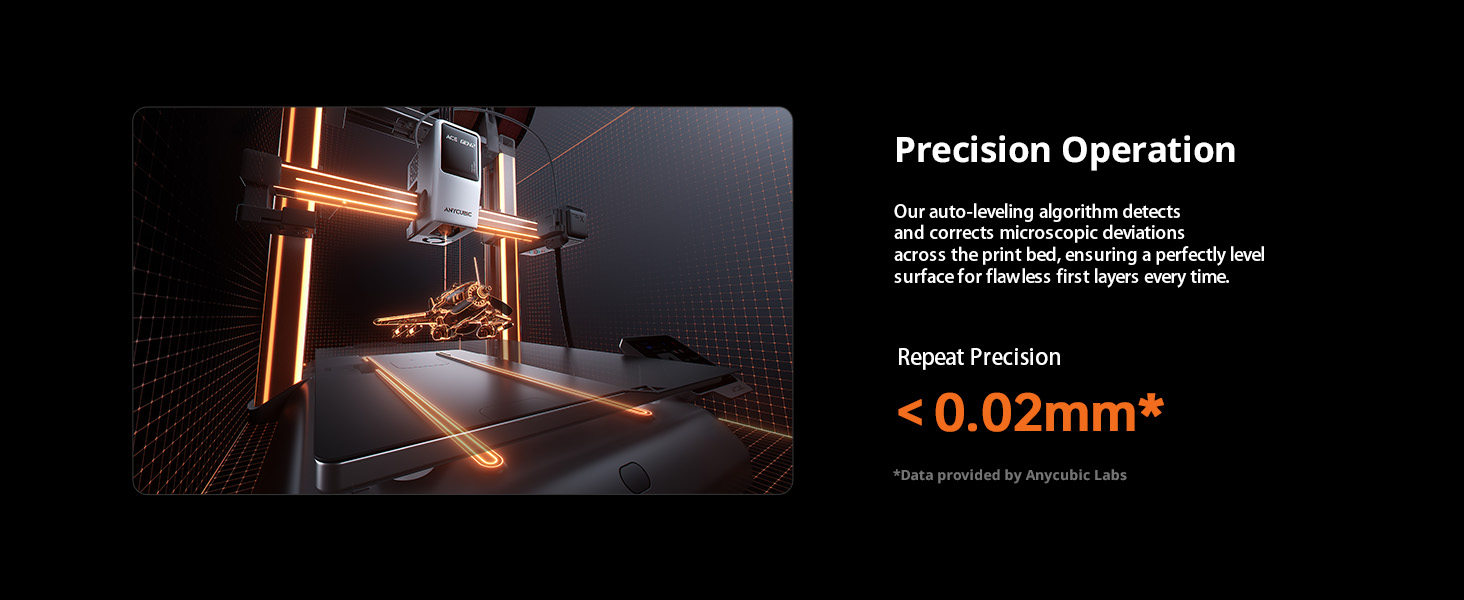
● Perfect First Layer
Powered by LeviQ 3.0 Auto-Leveling with automatic Z-offset adjustment to ensure consistent and reliable first-layer adhesion.
● Soft/Hard Multi-Material Printing
Compatible with a wide range of materials including PLA, PETG, TPU, PVA, PLA-CF, PETG-CF, and ASA, supporting flexible and reinforced filaments.
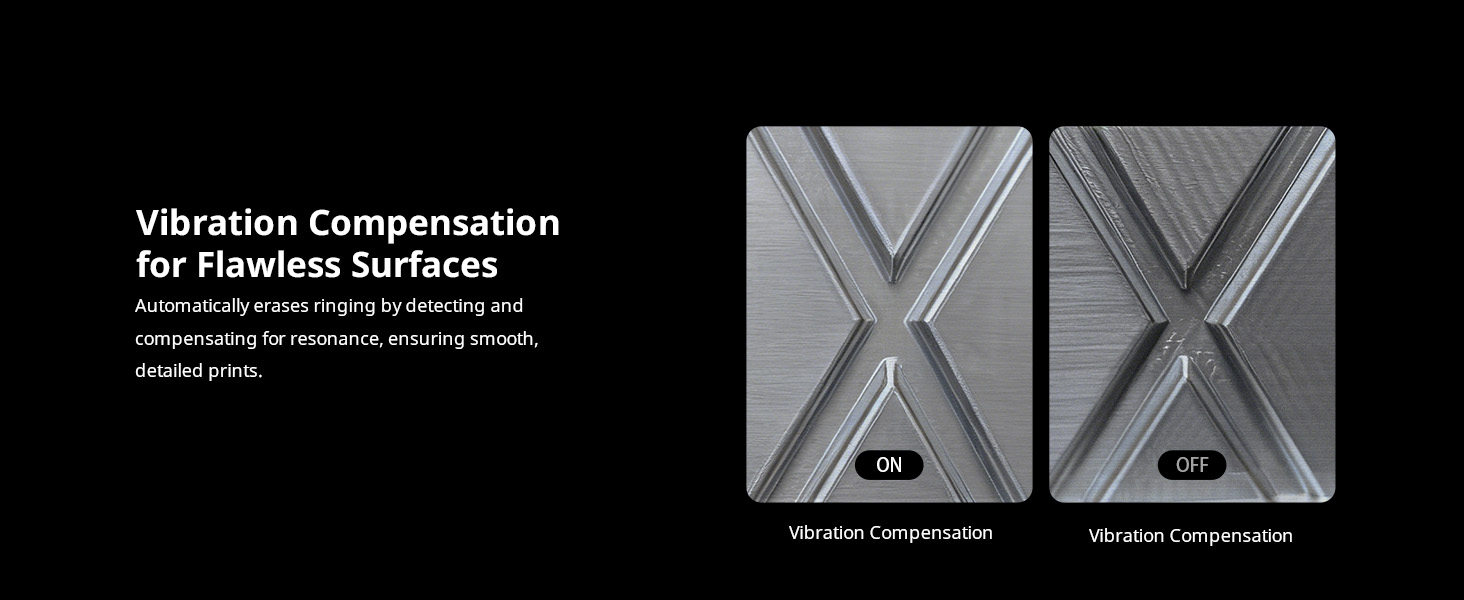
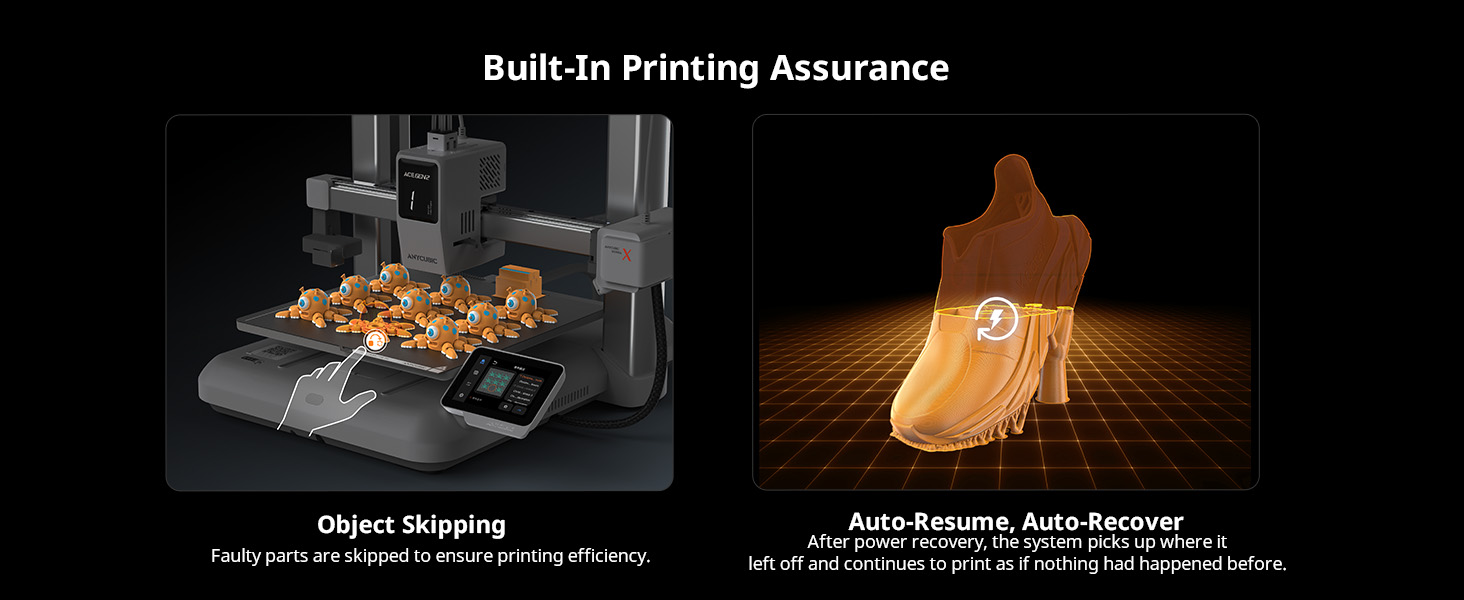
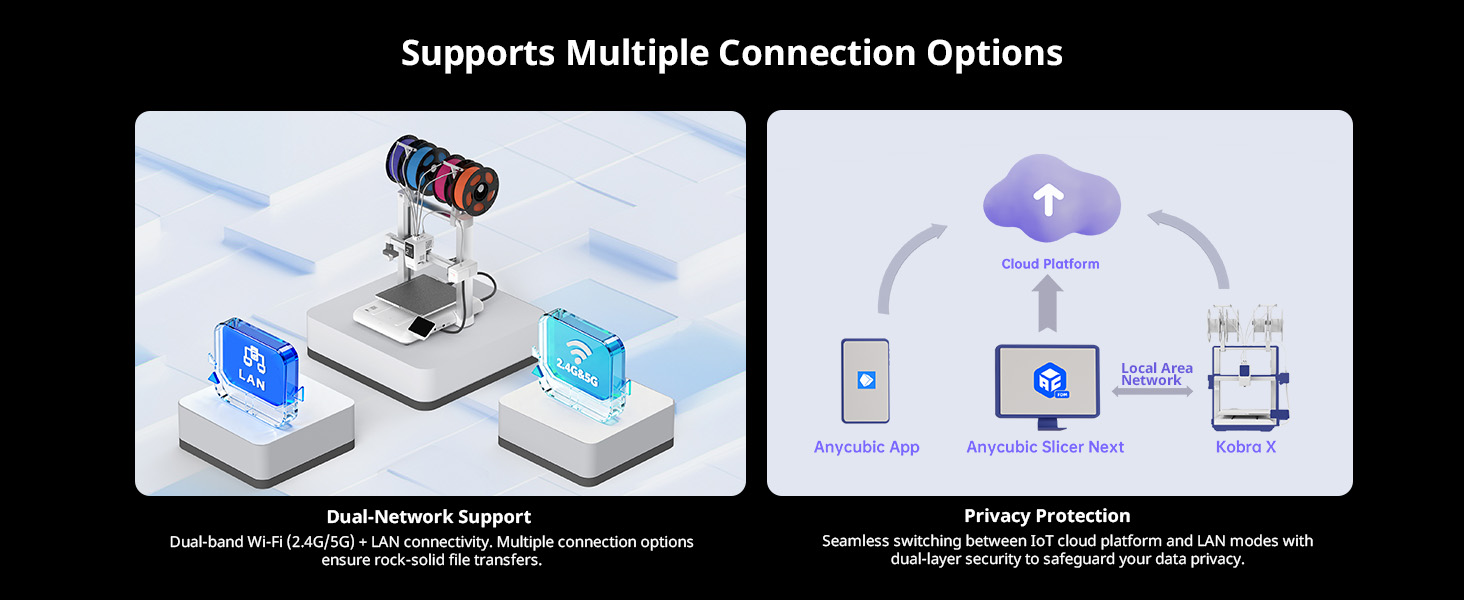
● AI Detection & Smart Monitoring
Integrated AI spaghetti detection, filament entanglement detection, and power-loss recovery help prevent printing failures.
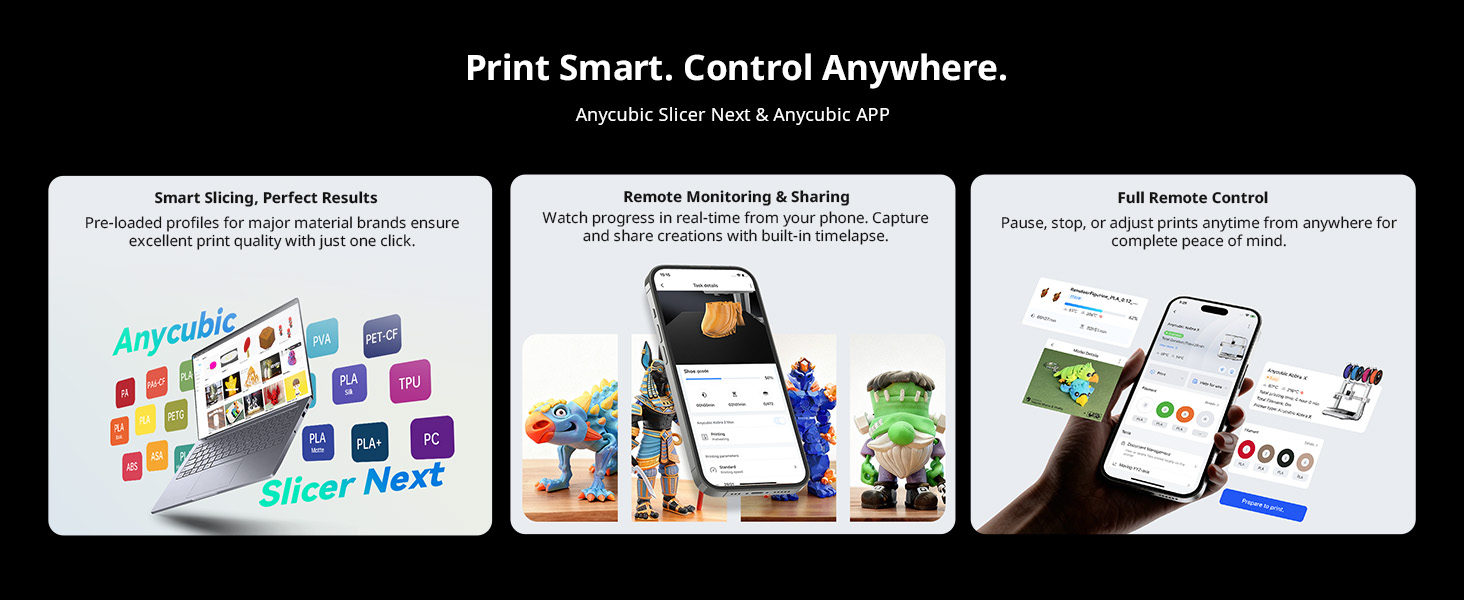
● Intelligent Remote Printing
Supports remote control and monitoring via printer interface, slicing software, Anycubic APP, or USB printing.
Product Specifications
Core Printing Performance
| Item | Description |
|---|---|
| Multicolor Printing | Native 4-color, expandable up to 19 colors |
| Printing Volume | 260 × 260 × 260 mm³ |
| Supporting Filaments | PLA / PETG / TPU / PVA / PLA-CF / PETG-CF / ASA |
| Printing Speed | Recommended 300 mm/s; Maximum 600 mm/s |
| Acceleration | Recommended 10,000 mm/s²; Maximum 20,000 mm/s² |
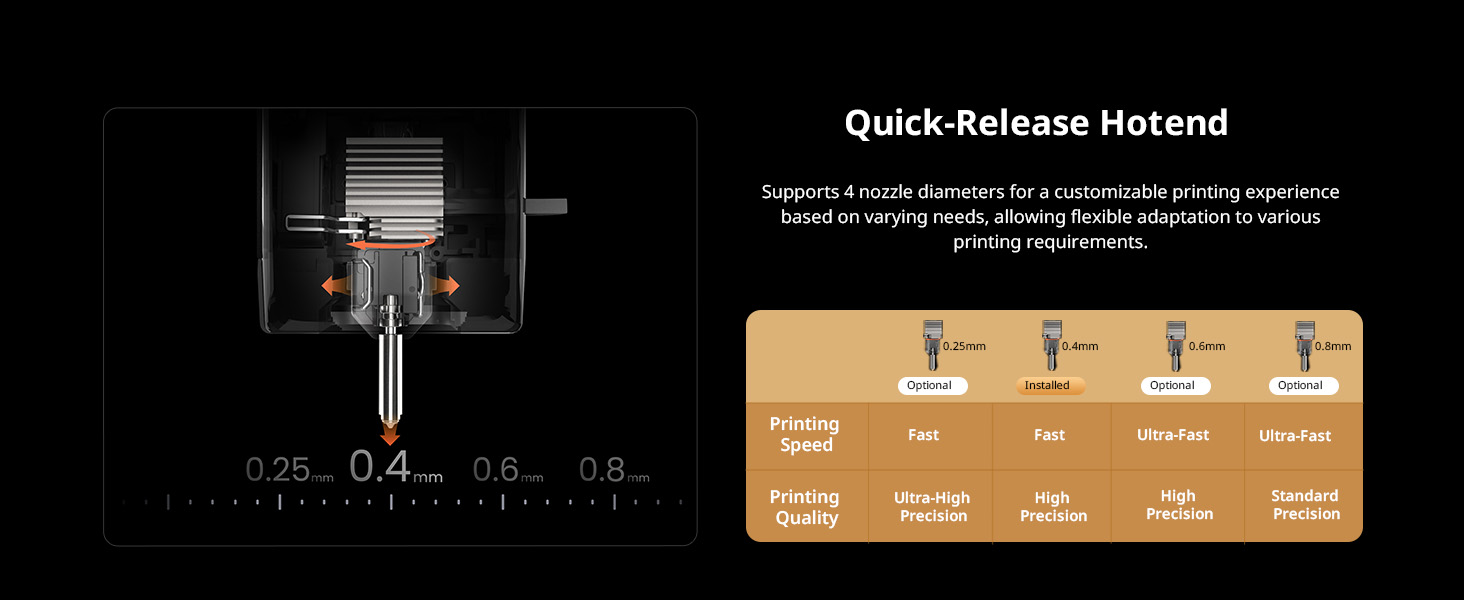
| Nozzle Specifications | Max Temp 300°C; Standard 0.4 mm (expandable to 0.25 / 0.6 / 0.8 mm); Hardened Steel Nozzle |
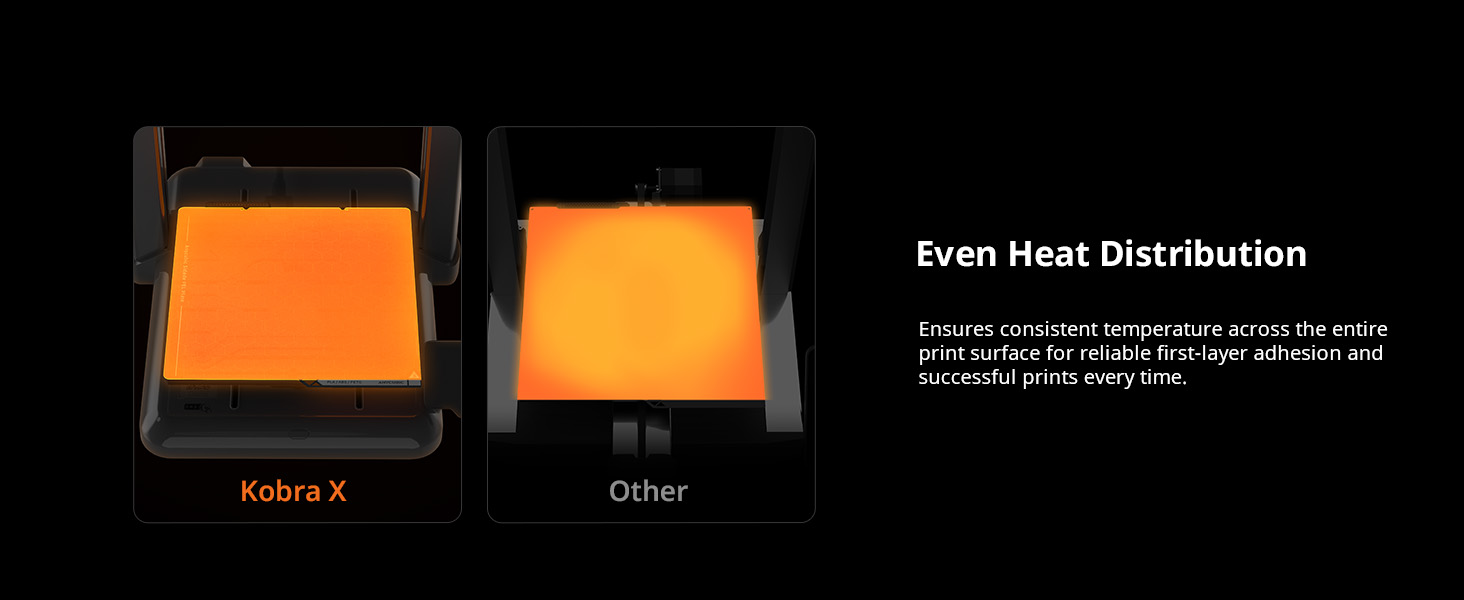
| Hotbed Specifications | Max Temp 100°C; PEI Spring Steel Build Plate |
System & Structural Design
| Item | Description |
|---|---|
| Firmware Solution | Kobra OS |
| Extrusion Type | Direct Drive (Short Distance Extrusion) |
| Machine Leveling | LeviQ 3.0 Auto-Leveling with Z-Offset |
| Pressure Advance / Flow Calibration | Supported |
| Power Loss Resume | Supported |
| Filament Detection & Auto Resume | Supported |
| Filament Entanglement Detection | Supported |
| AI Spaghetti Detection | Supported |
| Object-Skip & Area Leveling | Supported |
| Control Methods | Via Printer Interface / Slicing Software / Anycubic APP / USB (Print Only) |
User Experience & Features
| Item | Description |
|---|---|
| Noise | ≤ 48 dB |
| Video Monitoring | Standard HD Camera (Supports 720P) |
| Multilingual Support | EN / CN / DE / FR / IT / ES / RU / JP |
| Machine Weight | Kobra X: ~9.5 kg; ACE 2 Pro: 3.7 kg |
| Package Weight | Kobra X: 12.7 kg; Kobra X Combo: 18 kg; ACE 2 Pro: 4.8 kg |
| Machine Dimensions | Kobra X: 455.4 × 445.3 × 461.3 mm³; ACE 2 Pro: 368 × 291.5 × 236.5 mm³ |
| Packaging Dimensions | Kobra X: 540 × 520 × 280 mm³; Kobra X Combo: 530 × 530 × 510 mm³; ACE 2 Pro: 445 × 345 × 320 mm³ |
What’s in the Box
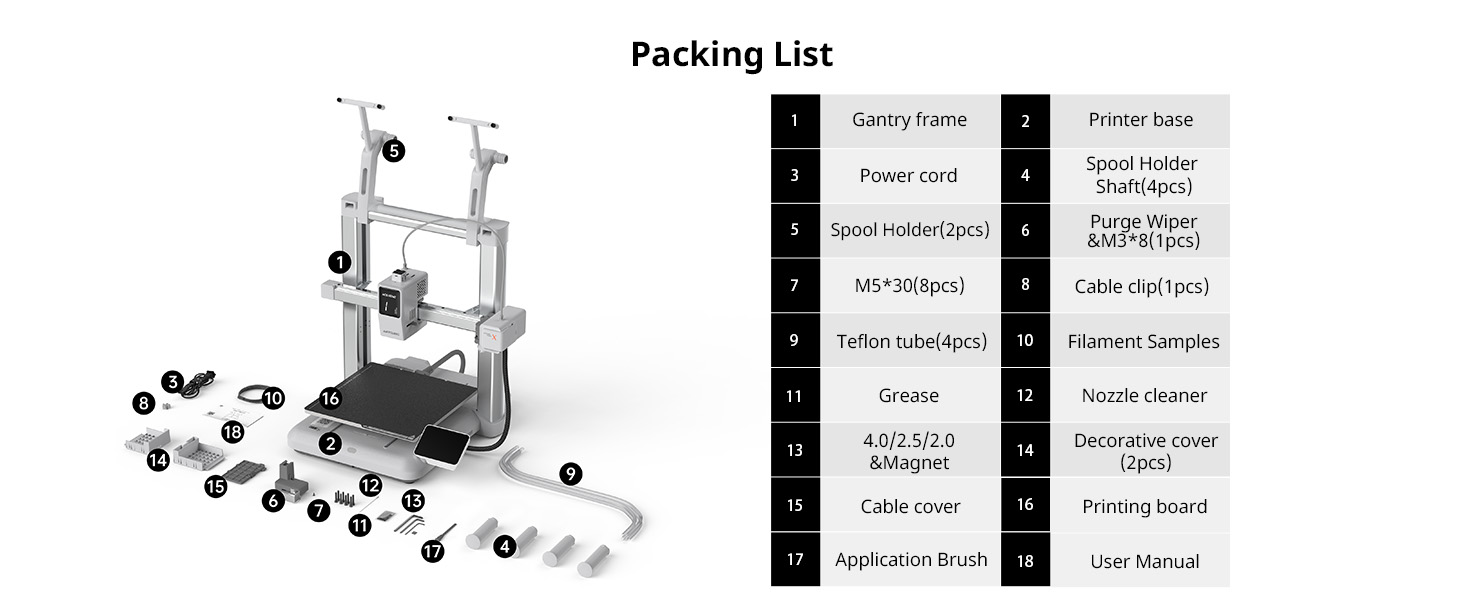
Gantry Frame;Printer Base;Power Cord;Spool Holder Shaft (4 pcs);Spool Holder (2 pcs);Purge Wiper & M3×8 (1 pc);M5×30 (8 pcs);Cable Clip (1 pc);Teflon Tube (4 pcs);Filament Samples;Grease;Nozzle Cleaner;Hex Keys (4.0 / 2.5 / 2.0) & Magnet;Decorative Cover (2 pcs);Cable Cover;Printing Board;Application Brush;User Manual
Manufacturer Details
Name: Shenzhen Anycubic Technology Co., Ltd.
Registered Address: 20F, Building 2, Jinxiu Hongdu Building, Meilong Avenue, Minzhi Sub-district, Longhua District, Shenzhen, Guangdong Province, China
Email: support@anycubic.com
Instructions for Use
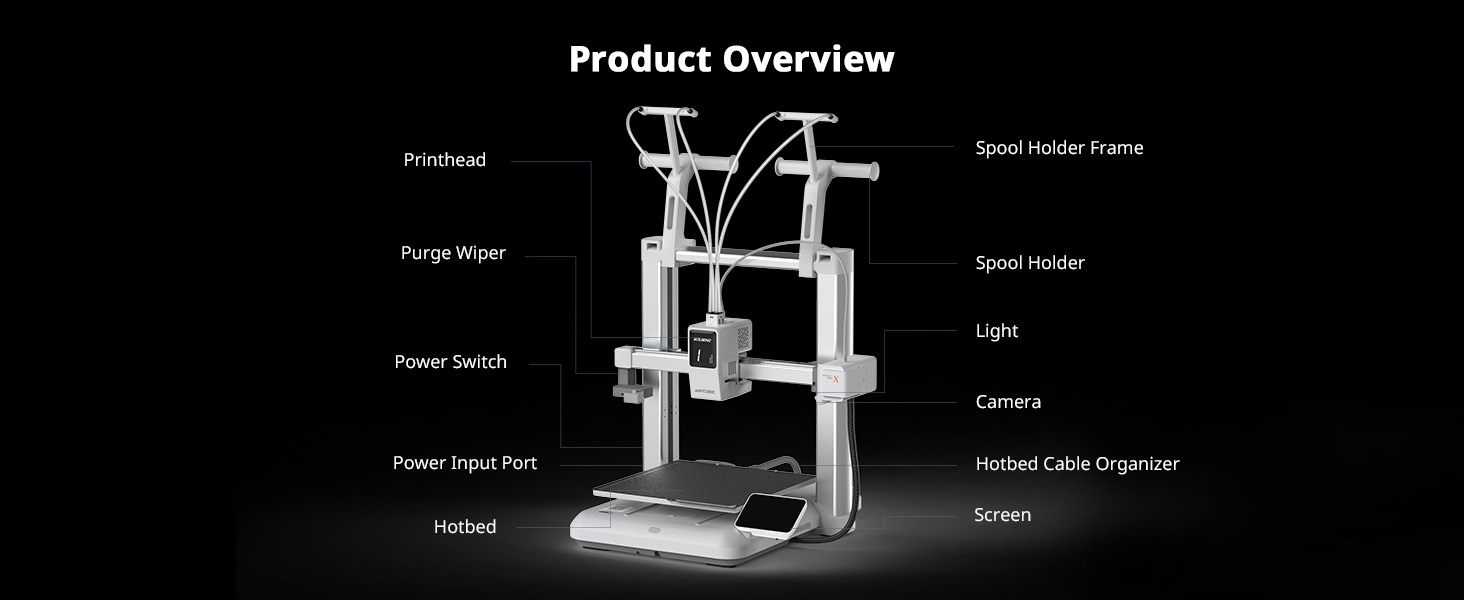
Basic Components
Gantry Frame, Printer Base, Spool Holder, Teflon Tube, Purge Wiper, Cable Clip, Printing Board, Nozzle, Extruder System, Build Platform, Motors, and Control Components.
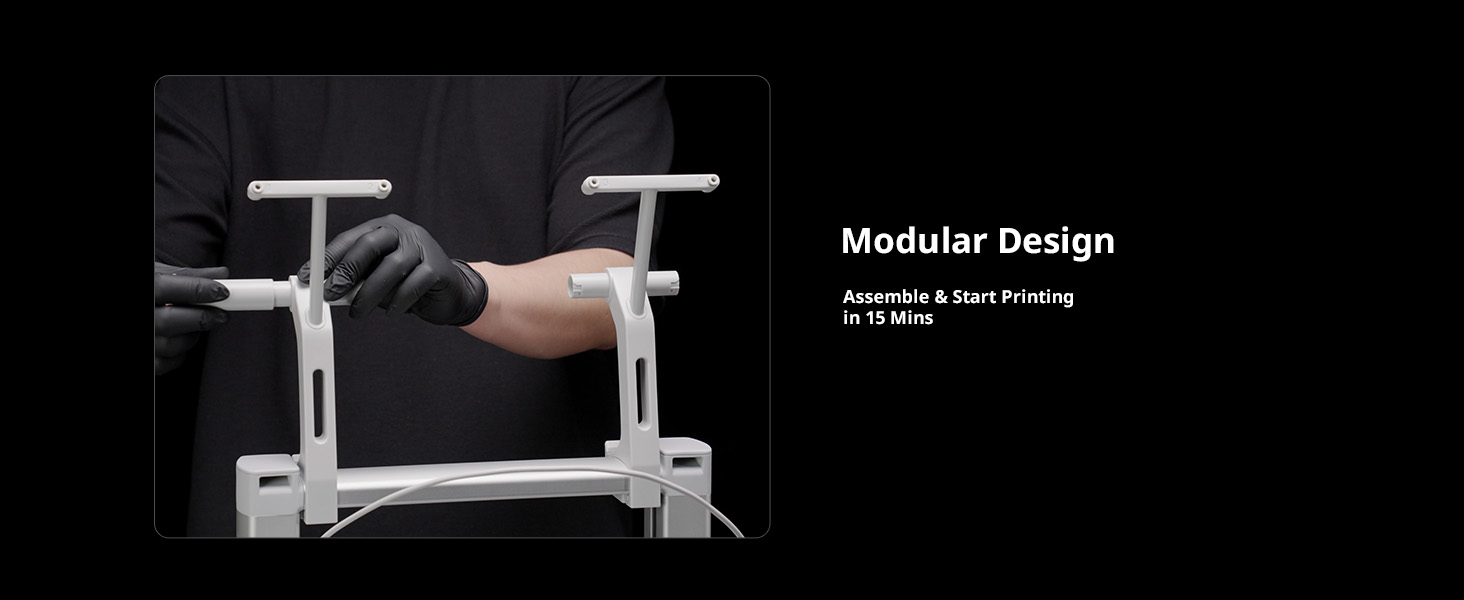
Quick Operation Steps
### ① Install the Printing Plate
1. Remove the print plate and printer base.
2. Install the print plate with the front (with silkscreen printing) facing up, aligning the edges of the print plate with the edges of the heated bed.
---
### ② Unlock the Gantry Z Axis
1. Use an H2.0 hexagonal wrench to loosen the six screws on the gantry frame's Z-axis fixture (three on each side, the same procedure applies).
---
### ③ Install the Gantry Frame
1. Grab the top horizontal axis of the gantry and lift the X-axis to 3/4 the height of the Z-axis for subsequent installation;
2. Push the printer base heated bed to the front to expose the screw positions between the base and the gantry frame;
3. Use an H4.0 hexagonal wrench to tighten the M5*30 screws (eight in total, four on each side) between the printer base and the gantry frame from top to bottom; - Note: It is recommended to hold the long end of the hexagonal wrench for secondary tightening.
4. Replace the decorative cover (press down to secure).
---
### ④ Connect the Printhead, Camera and XZ Axis Motor Cables
1. Tilt the printer backward to expose the bottom of the printer base;
2. Insert one end of the single-plug cable into the Z-axis interface on the machine base, and the other end into the interface on the bottom right side of the gantry frame. For the three-plug cable, insert it into the X-axis, Printhead, and CAM interfaces in descending order of the number of pins, and secure the cables into their respective slots;
3. Replace the cable cover. - Note: Please be sure to connect the corresponding cables according to the number of pins.
---
### ⑤ Install the Purge Wiper
1. Push the Purge Wiper from the front to the back into the left side of the machine.
2. Use an H2.0 hexagonal wrench to tighten the M3*8 (Inside the transparent bag for the material handling assembly) self-tapping screw from the back of the Purge Wiper.
---
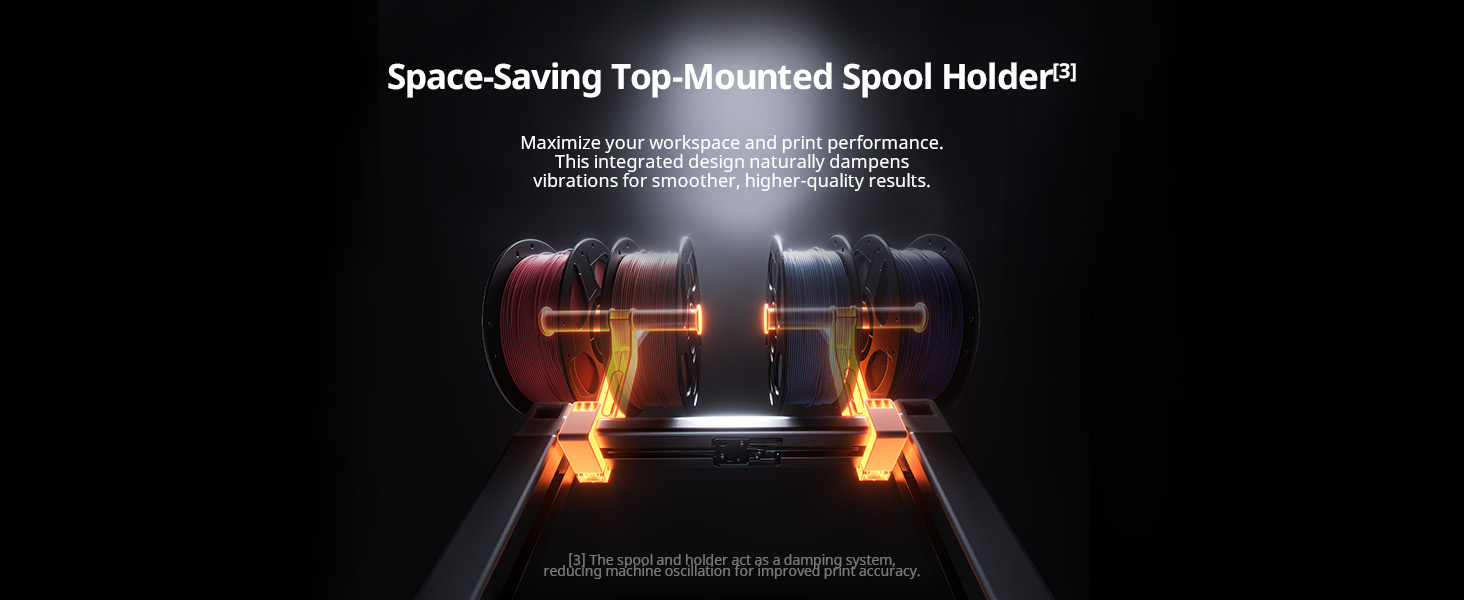
### ⑥ Install the Spool Holder
1. Assemble the two filament racks in sequence: Insert the support rods into the left and right sides of the spool holder, rotate and push until they are fully seated, then rotate downward and lock them securely.
2. Once the spool holder are assembled, snap them into place on the left and right sides of the horizontal axis at the top of the gantry. - Note: To facilitate material replacement, please move the spool holder to the left or right of the horizontal axis.
---
### ⑦ Install Teflon Tube Insert one end of each of the four Teflon tubes into the holes above the printhead, and the other ends into the feed ports on the front of the spool holders. (After completing all the above operations, you can power the machine using the power cord.) - Note: Ensure each tube is connected to the correct port as per the instructions.
Safety Warnings
1) The Anycubic 3D printer contains high-speed moving parts. Keep hands clear of moving parts to avoid injury.
2) If the machine is not in use for extended periods, please protect it from rain and moisture.
3) The Anycubic 3D printer generates high temperatures while in operation. Do not touch the working parts or the extruded material with your bare hands.
4) The nozzle of the machine can get very hot. Wear heat-resistant gloves when performing any operations to prevent burns.
5) In an emergency, immediately turn off the power to the Anycubic 3D printer.
6) Keep the Anycubic 3D printer and its accessories out of the reach of children.
7) When replacing the fuse, select a 250V, 10A fuse to avoid short circuits.
8) This device uses a removable plug. Unplug it if not in use for extended periods or if the power is off.
9) Minor scratches on the extrusion material or unevenness on the platform are normal as long as they do not affect normal printing.
UK REP
· Name: WSJ PRODUCT LTD
· Add: Unit 1, Alsop Arcade, Brownlow
· Contact: Michael
· Tel: +44 1519470193
· E-mail: info@wsj-product.com
Specifications
Reviews
Didn't find the answer? Ask other customers
5(1 review)