
24/7 Customer Support

Free returns

Same-day & Next-day Delivery

Quality Guaranteed

Unlock Your Welcome Offers: FREE Delivery | Up to 80% OFF | Free 30-day JoyPlus trial
Download the APP
Tired of the time-consuming and often messy process of painting with brushes and rollers? The endless cutting-in, the risk of drips and the struggle to get an even coat on detailed surfaces can take the joy out of a DIY project. An electric paint sprayer offers a modern solution, helping you achieve a smooth, professional-looking finish in a fraction of the time.
Whether you're refreshing your living room walls, upcycling a piece of furniture or giving your garden fence a new lease of life, the right tool is essential. This guide is designed to help you navigate the options and understand the key features to look for in a DIY paint sprayer, ensuring you select a model that fits your project needs perfectly.
Before diving into specific models, it's helpful to understand what separates one electric paint gun from another. Here are a few key considerations to keep in mind during your search.
The type of project you have planned is the most important factor. Are you tackling a large area or a small, detailed piece?
Most DIY sprayers use HVLP (High Volume, Low Pressure) technology. This is a key term to look for. HVLP systems use a high volume of air at a low pressure to atomise the paint into a fine, controlled spray. The main advantage for home use is significantly less overspray compared to high-pressure systems, meaning more paint lands on your project and less is wasted into the air. This makes an HVLP spray gun ideal for achieving a smooth, even finish with minimal mess.
Versatility is key. The ability to adjust the sprayer to suit different paints and surfaces will deliver better results. Look for models that offer:
Here are our recommendations for electric paint sprayers that offer a great combination of features, performance and value for common UK DIY projects.
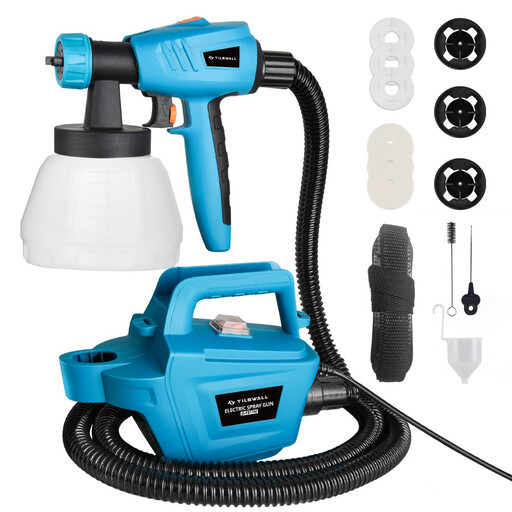
Why It Stands Out: This model's main advantage is its split design. The powerful 800W motor sits on the floor or can be carried with a shoulder strap, while you only hold the lightweight spray handle. This significantly reduces arm fatigue, making it well-suited for larger, more demanding jobs.
The combination of a large 1300ml container and a long 2.5m air hose provides excellent freedom of movement and minimises downtime for refills. With variable air pressure control and three nozzle sizes, it can handle paints with a viscosity of up to 120 din/s, offering great versatility for both interior and exterior applications.
Pros:
Who is it for? DIYers tackling medium to large-scale projects like painting entire rooms, long garden fences, sheds or decking, who need sustained power without the arm strain.
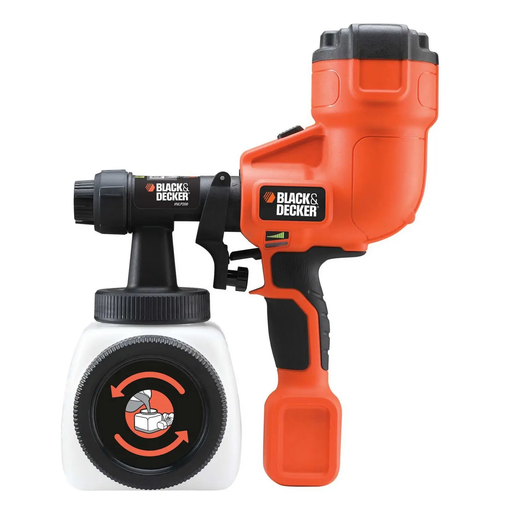
Why It Stands Out: Simplicity and user-friendliness are at the core of this BLACK+DECKER model. As a compact handheld paint sprayer, it's incredibly easy to set up and use, making it a great entry point for those new to spray painting.
A standout feature is the clear Paint Flow Indicator, which shows your current setting at a glance, helping you achieve consistent results every time. The side-filling canister is another practical touch, allowing you to top up paint quickly and cleanly without having to dismantle the sprayer. Its HVLP technology ensures a smooth finish with reduced overspray.
Pros:
Who is it for? Beginners and experienced DIYers alike who need a reliable, no-fuss tool for smaller jobs like upcycling furniture, painting doors, shelving and other home décor projects.
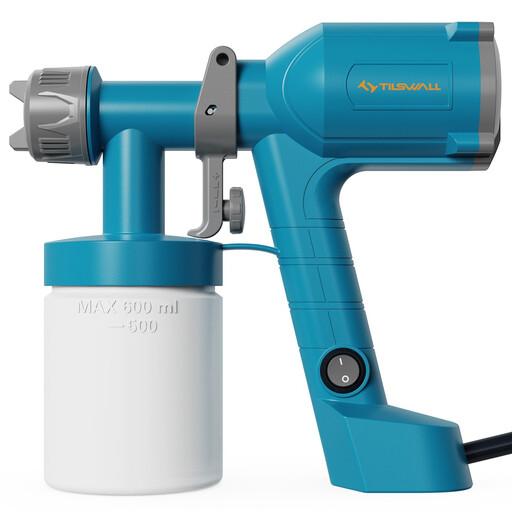
Why It Stands Out: The defining feature of this TILSWALL sprayer is its exceptionally low weight. The brand states it is constructed with advanced, lighter materials to minimise user fatigue. This makes a noticeable difference during extended use or when working on overhead surfaces like ceilings.
Despite its light build, it remains a versatile tool with two interchangeable nozzles (1.5mm and 2.0mm) and three spray patterns. It’s designed for straightforward operation, making it accessible for beginners while still delivering the smooth, even coverage required for a quality finish on walls, fences and furniture.
Pros:
Who is it for? Anyone who prioritises comfort and is concerned about the weight of their tools. It's particularly well-suited for long painting sessions or for projects that involve painting at awkward angles or overhead.
If these models don't quite match what you're looking for or if you'd like to compare a wider variety of tools, there are many other options available.
? Explore our full range of paint sprayers to find the perfect tool for your next project.
1. Can you use standard emulsion paint in an electric paint sprayer? Yes, but in most cases, you will need to thin it first. Most wall paints are too thick (viscous) to be atomised properly straight from the tin. Your sprayer's manual will specify the maximum viscosity it can handle (measured in DIN-s). Use the viscosity cup provided with the sprayer to test your paint and thin it with a small amount of water until it flows through the cup within the recommended time.
2. Is an electric paint sprayer really faster than a roller? For most projects, yes. On large, flat surfaces like walls, a sprayer can be significantly faster. The real time-saving comes with complex surfaces like detailed furniture, intricate trim or slatted fences, where a sprayer can apply an even coat in minutes, a task that could take hours with a brush.
3. How do I prevent drips and runs when using a paint sprayer? The key is technique. Always keep the sprayer moving in a steady, consistent motion, holding it parallel to the surface at a constant distance (usually 15-30cm). Overlap each pass by about 50% to ensure even coverage. Start spraying just before you reach the object and release the trigger just after you pass it to avoid a heavy build-up of paint at the start and end of each stroke.